Step by Step Guide to Set Up Your Android Head Unit in Your Car for Newbies
- aestmodauto

- Mar 10
- 3 min read
Installing an android headunit in your car can transform your driving experience. It brings smart features like navigation, music streaming, hands-free calls, and more right to your dashboard. For those new to this, the setup might seem tricky, but with the right steps and a clear user manual, you can have your android player up and running smoothly. This guide breaks down the process into simple steps, helping you avoid common pitfalls and enjoy your new car tech quickly.
What You Need Before Starting
Before you begin, gather these essentials:
Your android headunit device
Basic tools: screwdrivers, wire strippers, electrical tape (For Installers)
Wiring harness adapter (specific to your car model)
A stable Wi-Fi connection or mobile hotspot for initial setup
Step 1. Remove the Old Car Stereo
Start by safely removing your current car stereo:
Disconnect your car battery to avoid electrical shorts.
Use the appropriate tools to remove the dashboard panel around the stereo.
Carefully unplug the wiring harness and antenna cable from the back of the old unit.
Keep screws and panels in a safe place for reassembly.
This step clears the space for your new android headunit.
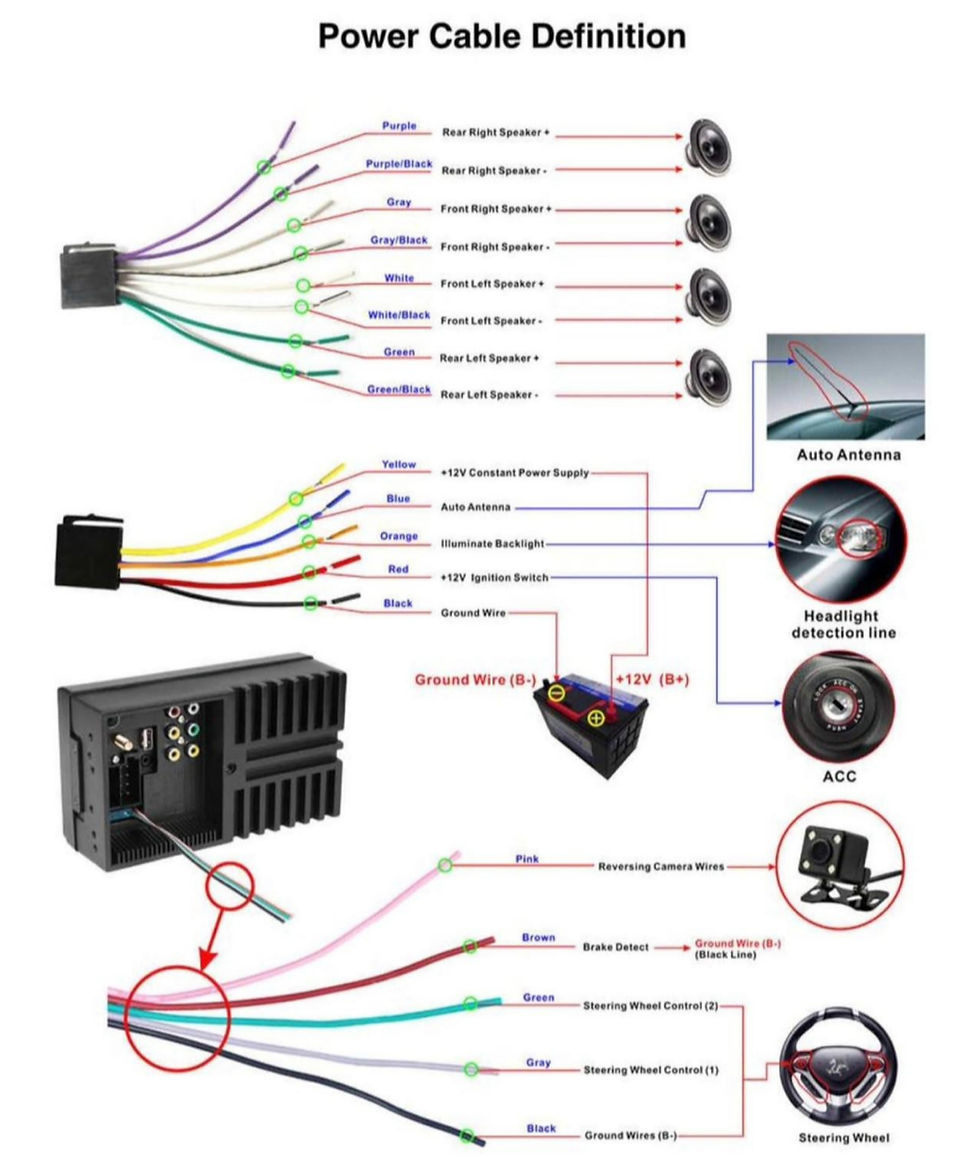
Step 2. Connect the Wiring Harness
The wiring harness connects your car’s electrical system to the android player:
Match the wires from the harness adapter to the wires on your android headunit using the color codes in the user manual.
Use wire connectors or soldering for secure connections.
Wrap connections with electrical tape to prevent shorts.
Connect the antenna cable to the new unit.
If your car has steering wheel controls, check if your android player supports them and connect accordingly.
Step 3. Mount the Android Headunit
With wiring done, place the android headunit into the dashboard:
Slide the unit into the mounting bracket.
Secure it with screws removed earlier.
Reattach the dashboard panels carefully.
Make sure the unit fits snugly and buttons or touchscreen are fully accessible.
Step 4. Power On and Initial Setup
Reconnect your car battery and power on the android player:
Hotspot/WIFI , SIM CARD
After you have fully insert your sim card, you need to restart the headunit.
After restart, if APN settings is required for your data sim please edit accordingly. ( I know SIMBA / TPG requires to setup APN
For WIFI connection , simply turn on your Hotspot from your phone, then connect to the WIFI of your Android headunit. (Both 2.4ghz/5ghz is supported)
Setup your SIMBA APN https://youtu.be/UfUDi0MBAYE
Sign in with your new Google account (Use a new one so that it will not sync your phone contacts to the new device, the device will recognize as 0 contacts, and wipe out your original account)
After setting up your new Google account, login in Android headunit, update those apps that you will be using in the Google play store. Do make sure that Google play services is updated as well.
This setup process is similar to setting up a new smartphone.
Step 5. Customize Settings and Install Apps
Once the basic setup is complete, customize your android headunit:
Adjust screen brightness and sound settings for comfortable use.
Set up Bluetooth to connect your phone for calls and music.
For apple carplay on android auto , all u need is to pair your bluetooth and tab on Carlink 2.0 / Zlink /Tlink app.
RELATED : Carplay Troubleshoot : https://www.androidatc.com.sg/carplay-wont-connect
.

Refer to the additional videos on our Telegram Aftersales for advanced settings like equalizer adjustments or backup camera integration.
DSP Equalizer setup: https://youtu.be/7epghiV4Jfc
Tips for a Smooth Experience
Join us in Telegram After Sales Group ATC
Use a wiring harness adapter specific to your car model to avoid cutting factory wires.
Take your time with wiring to ensure all connections are solid.
If unsure about any step, consult a professional installer.
Only update your apps or firmware when there is issue working on them.
If your unit performs weird , just do a RESTART first , if not poke the RST(Reset hole) using a mobile pin to operate it . If the pin is too thick it will easily break the tempered glass of the LCD.


This is such an amazing walkthrough for newbies! Splitting up the installation procedure step by step makes it easy for anyone to understand. An online video production company in Dubai knows how important visual clarity is when it comes to making compelling content.